A vernier scale is a device that lets the user measure more precisely than could be done unaided when reading a uniformly-divided straight or circular measurement scale. It is scale that indicates where the measurement lies in between two of the marks on the main scale. Verniers are common on sextants used in navigation, scientific instruments used to conduct experiments, machinists' measuring tools (all sorts, but especially calipers and micrometers) used to work materials to fine tolerances, and on theodolites used in surveying.

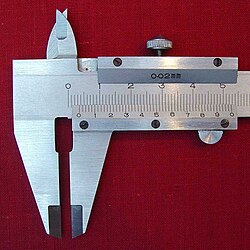
A vernier caliper
Contents
- 1 History
- 2 Construction
- 3 Use
- 4 Examples
- 5 How a vernier scale works
- 6 Vernier acuity
- 7 Zero error
History
The vernier scale originated in ancient China as early as the Xin dynasty (9 AD). It was reinvented in its modern form in 1631 by the French mathematician Pierre Vernier (1580–1637). Its use was described in detail in English in Navigatio Britannica (1750) by John Barrow, the mathematician and historian. In some languages, this device is called a nonius and it was also commonly called a nonius in English until the end of the 18th century. Nonius is the Latin name of the Portuguese astronomer and mathematician Pedro Nunes (1502–1578) who in 1542 invented a related but different system for taking fine measurements on the astrolabe (nonius) that was a precursor to the vernier. The French astronomer Jérôme Lalande (1732–1807) popularized the name of the instrument as a "vernier" in his book on astronomy Traité d'astronomie (2 vols) (1764).Construction
In the following, N is the number of divisions the maker wishes to show at a finer level of measure.Direct verniers are the most common. The indicating scale is constructed so that when its zero point is coincident with the start of the data scale, its graduations are at a slightly smaller spacing than those on the data scale and so none but the last graduation coincide with any graduations on the data scale. N graduations of the indicating scale cover N−1 graduations of the data scale.Retrograde verniers are found on some devices, including surveying instruments. A retrograde vernier is similar to the direct vernier, except its graduations are at a slightly larger spacing. N graduations of the indicating scale cover N+1 graduations of the data scale. The retrograde vernier also extends backwards along the data scale.Direct and retrograde verniers are read in the same manner.Use
The main use of the vernier caliper is to measure the internal and the external diameters of an object. To measure using a vernier scale, the user first reads the finely marked "fixed" scale (in the diagram). This measure is typically between two of the scale's smallest graduations. The user then reads the finer vernier scale (see diagram), which measures between the smallest graduations on the fixed scale—providing much greater accuracy.Examples
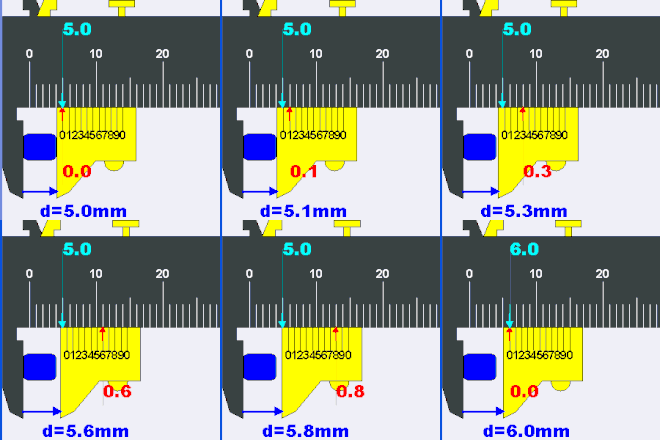
On decimal measuring instruments, as in the diagram below, the indicating scale has 10 graduations that cover the same length as 9 on the data scale. Note that the vernier's 10th graduation is omitted.On an angular measurement instrument, the data scale might be in half-degrees, with an indicator scale that provides 30 1-minute graduations (that span 29 of the half-degree graduations).How a vernier scale works
The vernier scale is constructed so that it is spaced at a constant fraction of the fixed main scale. So for a decimal measuring device each mark on the vernier is spaced nine tenths of those on the main scale. If you put the two scales together with zero points aligned, the first mark on the vernier scale is one tenth short of the first main scale mark, the second two tenths short, and so on up to the ninth mark—which is misaligned by nine tenths. Only when a full ten marks are counted is there alignment, because the tenth mark is ten tenths—a whole main scale unit short, and therefore aligns with the ninth mark on the main scale.Now if you move the vernier by a small amount, say, one tenth of its fixed main scale, the only pair of marks that come into alignment are the first pair, since these were the only ones originally misaligned by one tenth. If we move it two tenths, the second pair aligns, since these are the only ones originally misaligned by that amount. If we move it five tenths, the fifth pair aligns—and so on. For any movement, only one pair of marks aligns and that pair shows the value between the marks on the fixed scale.Vernier acuity
Main article: Vernier acuityVernier scales work because the human eye can detect that two line segments are aligned. Vernier acuity is the ability by a person to detect the proper alignment of two line segments. In most people, Vernier acuity is particularly high, enabling accurate differentiation between aligned and misaligned marks on a vernier scale.Zero error
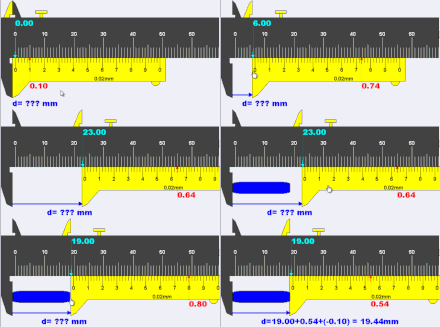
The method to use a vernier scale or caliper with zero error is to use the formula: actual reading = main scale + vernier scale − (zero error). Zero error may arise due to knocks that cause the calibration at the 0.00 mm when the jaws are perfectly closed or just touching each other. when the jaws are closed and if the reading is 0.10mm, the zero error is referred to as +0.10mm. The method to use a vernier scale or caliper with zero error is to use the formula 'actual reading = main scale + vernier scale − (zero error)' thus the actual reading is 19.00 + 0.54 − (0.10) = 19.44 mmPositive zero error refers to the fact that when the jaws of the vernier caliper are just closed, the reading is a positive reading away from the actual reading of 0.00mm. If the reading is 0.10mm, the zero error is referred to as +0.10 mm.
 when the jaws are closed and if the reading is −0.08mm, the zero error is referred to as −0.08 mm. The method to use a vernier scale or caliper with zero error is to use the formula 'actual reading = main scale + vernier scale − (zero error)' thus the actual reading is 19.00 + 0.36 − (−0.08) = 19.44 mmNegative zero error refers to the fact that when the jaws of the vernier caliper are just closed, the reading is a negative reading away from the actual reading of 0.00mm. If the reading is 0.08mm, the zero error is referred to as −0.08mm.


